Fashion Retouching is the process of enhancing fashion photos by removing distracting elements and highlight beauty. These fashion retouching tips are like a checklist during retouching fashion or beauty photos. Fashion retouching like an expert requires the right approach to retouch in less time because time is money, and meeting deadlines is essential. We will discuss how to approach different elements of retouching with tools in Adobe Photoshop.
Apply layers to your artwork
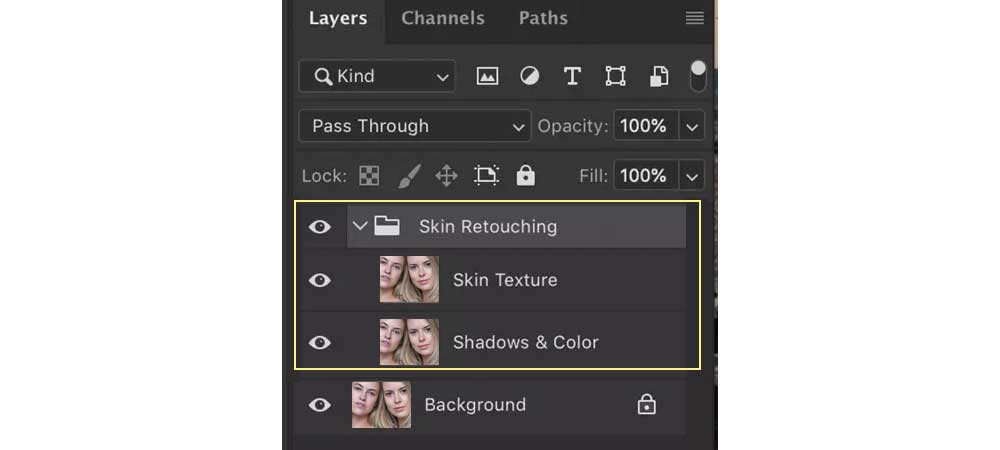
If you think that layers and masks are not necessary for retouching photos because you got the hang of retouching, you are probably wrong. Even professional retouchers use layers to retouch photos. Layers are helpful to edit or retouch by making changes to the photo without worrying about ruining the original copy. We can undo mistakes, add multiple layers to form a composition, and edit each layer independently. There are various types of layers under the Layers tool that you can apply to the photos, such as the Type layer, adjustment layer, and Smart Object.
Using Frequency Separation
With frequency separation, we can retouch the skin tone without spoiling the texture of the photo. One common method to use frequency separation is to use two layers as high frequency and low frequency. The high frequency layer is used for retouching the skin texture, and the low frequency layer is used for retouching underlying colors and tones. This technique can be saved as actions for further use, and it lets us edit each detail separately. Frequency separation can also be used to sharpen elements in the photo.
Keep skin natural-working on skin tones
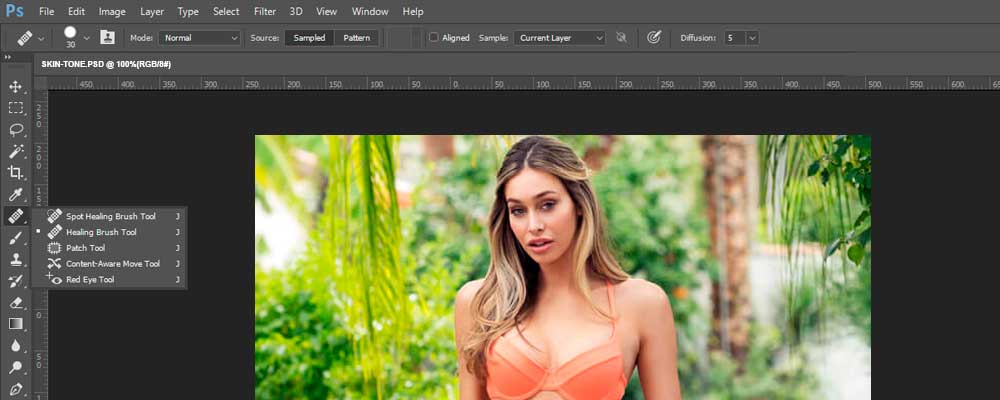
We do not want our photos to look unrealistic after grueling hours of photoshoot and editing, and this happens when we retouch the photos too much and make the subject look plastic and fake. When the photo is viewed in high resolution, the model’s skin has to look flawless yet natural. The ideas contradict. However, as a professional, you would want to understand the subject’s skin. We first focus on the major corrections and then move to minor corrections. The process to follow for retouching skin is – using the Clone Stamp tool/Spot Healing Brush tool > Dodge and Burn > Color correction. This technique will cover elements such as removing blemishes, evening skin tone, and fixing color balance. Do not use the blur tools on the face. This smoothens the texture and results in a polished look.
Color correction
We make sure the portrait photo retouching does not make the person look like a wax model by over-retouching the skin. We can fix the white balance using the Eyedropper tool by taking a sample of a spot that is supposed to look white/grey/black. Experimenting with various spots, we choose the best natural-looking skin tone. Use the Selective Color Adjustments layer in the Properties section to focus on bright colors like yellow, red, etc. To blend the color into the photo, we can use Clipping Path. Here, part of the photo is selected for color correction instead of the entire photo.
Retouching Teeth
A portrait photo is incomplete without teeth whitening using photo retouching. Having a perfect white smile is a sign of beauty. We should do fashion Retouching carefully as the Hue/Saturation tool affects all the colors in the photo; we will be focusing on whitening teeth. We first adjust the saturation of reds and yellows by checking the color of teeth. Then we modify the layers and use the Brush tool to paint over the teeth for a perfect finish. You could also use the Lasso tool to select the teeth as a layer. Even so, overdoing teeth by reducing the natural whiteness will distract the viewer or give an artificial look.
Enhancing eyes
Retouching eyes is one of the trickiest parts of fashion retouching or high-end beauty retouching. The aspects of dealing with when it comes to retouching eyes are eye shadow enhancement, red-eye removal, changing the color of the iris, and redness/extra veins removal. Use the Lasso tool to select the eyes, apply Gaussian Blur and play around with the opacity levels to match the eyes with the face.
Enhancing hair
We spoke about flyaway hair and filling empty spots during fashion retouching in our previous blogs. We can use the Transform Warp feature to retouch hair to increase the volume and length of hair and to shape the hair beautifully. We can also use the Liquify tool to reshape hair.
Unwrinkling clothes
To remove unwanted wrinkles or folds on the fabrics in your photo, you can use Frequency Separation. First, create two layers, “Low” and “High,” above the actual photo. Select the Low layer and in the Filter menu, select Blur > Gaussian Blur. In the Dialog box, increase the Radius value till you stop seeing the fabric properly. Now, take away the low frequency layer from the high frequency layer to only use the high frequency layer. Select Image > Apply image > Layer[low frequency] > Blending[Subtract] > Scale=2, Offset=128 > Ok. After that, change the blend mode from Normal to Linear Light. Now select the “Low” layer, using the mixer brush tool(without changing the settings) brush over the wrinkled fabric to remove the wrinkles and folds. In the case of ghost mannequins, the model’s shape is preserved in the apparel, but it still has creases and wrinkles. We can use frequency separation to remove wrinkles on Ghost Mannequins also. Retain some of the folds to make the fabric look realistic.
Background objects elimination
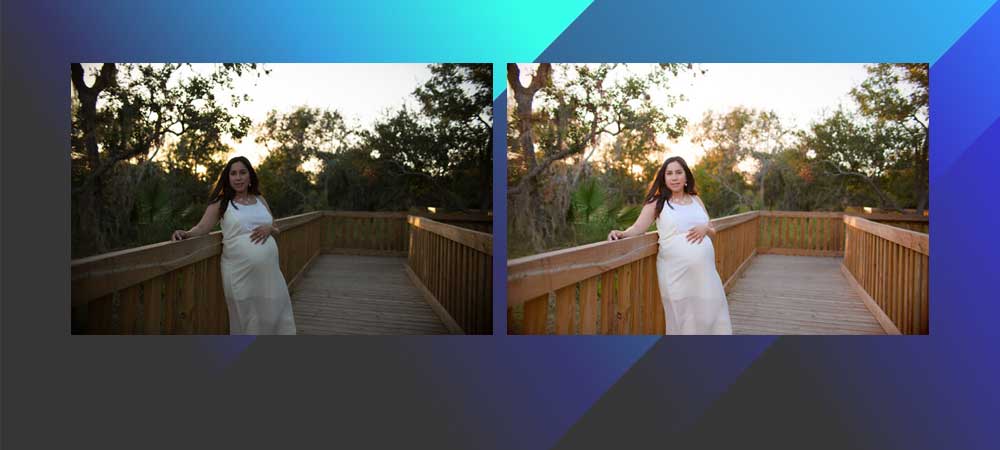
Sometimes the objects or people in the background of an image act as distracting elements. It is easy to decide what goes into the frame in studio environments, but in outdoor photoshoots, controlling the environment is challenging. The distracting element can be a large object or a small object. Removing it from the photo shifts the focus towards the subject. We can use the clipping path tool to select the boundaries of the object and crop it. Then we can use the Clone Stamp tool to replace the empty space with the background or use the content-aware tool to replace large objects.
Bonus tips
- Adjust noise in the photos to make the subject look natural. In-studio environments might affect the colors and density of the photo and might do injustice to the model’s appearance. Use the Reduce Noise filter to correct the noise levels in the photo.
- It would help if you had a lot of experience to know how to retouch an image perfectly. However, do not spend too much time retouching a photo. You might be under delusion and make wrong decisions in perfecting the photo. First, have the vision to identify where the distracting elements lie and then think of the tools and presets you will need to use.
These are the fashion retouching services that we offer to name a few. Our retouch experts will make sure the photos look natural and not plasticized. We also provide newborn baby retouching services.
Services also include enhancing lip and cheeks color, adjusting curves, recoloring, enhancing apparel, image compositing (for group photos). All you need is to send us some samples with the required specifications. Just leave fashion retouching to us.