Love your old images? But heartbroken because they’ve been tampered with or damaged?
Cyclic conditions such as heat and humidity followed by cold, dry weather are highly damaging to photos, causing cracking and separation of the emulsion from the support, which serves as the photo’s foundation. Old photodamage is further worsened by dirt, dust, and stains. Temperature, humidity, and sunlight all have a more significant impact on images than any other aspect.
The various apps such as Adobe Photoshop, PhotoWorks, Luminar4, Fotor, PhotoScape, etc., support photo restoration. The software has many tools to help restore the old photos. They have tools to deal with multiple imperfections.
An alternative way to restore old photographs is to hire a professional photo retouching service. The high-end image retouching services help us restore old and ruined photographs due to physical factors.
1. Scan to digitalize the photos
Your main consideration is for the highest possible quality of scanned images. Use a scanner with a resolution of at least 300 dpi, which is the best resolution of any scanned image. If you don’t have a high-quality scanner, a good capture of the image will work. The more nuances you can keep, the more flawless your images will be.
It’s a good idea to save a copy of the scanned image in the highest resolution. This guarantees that you have a backup option in case you make non-destructive changes to the image.
2. Adjust, crop, and straighten the image
After you’ve scanned the old images, open the digital file in Photoshop. Before you begin, you may need to rotate the photo for the perfect orientation.
Adjust the other elements of the photos to your preference or your client’s preference. The basic modifications you perform include cropping, straightening, and rotating. Having a clean and well-organized image will make the editing process go more smoothly.
Crop your photos before beginning the restoration procedure so that you don’t have to deal with unnecessary components. Use print resolution to ensure that your image prints at the size you want.
It’s important to stick to traditional photo print sizes, so you don’t have problems finding a picture frame for your images later on. Some of the standard print sizes are-
- 4 x 6
- 8 x 10
- 10 x 13
- 16 x 20
- 18 x 24
- 20 x 24
3. Layers for non-destructive edits
Use multiple layers. If you don’t use numerous layers, you’ll have to start over. Using duplicate layers is a simple approach to prevent this issue. This simply layers a duplicate of your image on top of the original. You may duplicate the layer and label it for each phase of the procedure.
There might be a dust and scratches layer, a colour tone layer, and a contrast layer, among other things. If you end up with too many layers and are confident with your changes thus far, you could just merge layers. Simply click on a layer and then hold down the Shift or Control key to select the other layers you’re done with. Then, using the right-click menu, select Merge Layers.
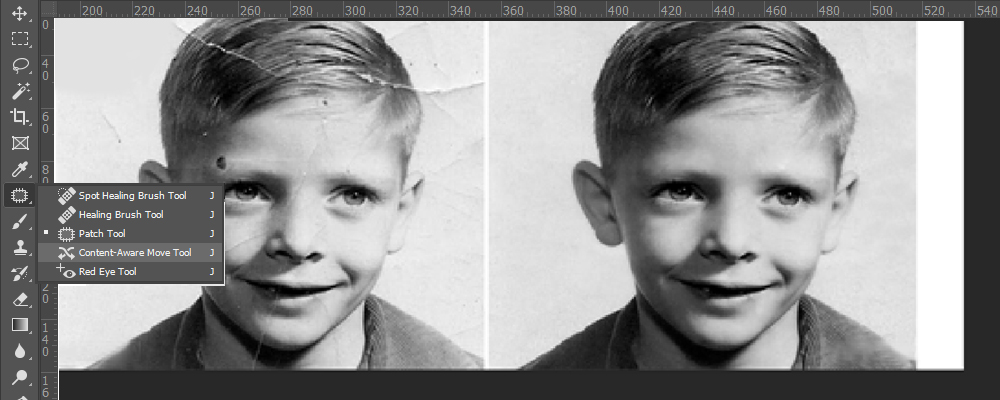
4. Fixing damaged areas in the photo
The various damages such as broken, torn images, extreme scratches, and faded images can be fixed with the following replacing tools in Adobe Photoshop-
Clone Stamp: The clone stamp tool uses a sample to paint an image. The sample is taken from regions of the photograph that closely reflect the target region that has to be modified. It may be used to replicate things as well as erase flaws or white lines.
Elliptical marquee: This tool picks a portion of your image in an oval or circular form, which may then be further modified using Adobe Photoshop’s various tools.
Spot healing brush: This tool removes spots and undesired elements like the patch tool.
The smart brush tool is used to make tone and colour adjustments to specific areas of a photo. This tool may be used to remove scratches and other types of damage.
The burn tool darkens portions of an image to bring out dimensions (to increase exposure).
Read Also:- Why Businesses Need Photo Retouching Company To Suit Your Business?
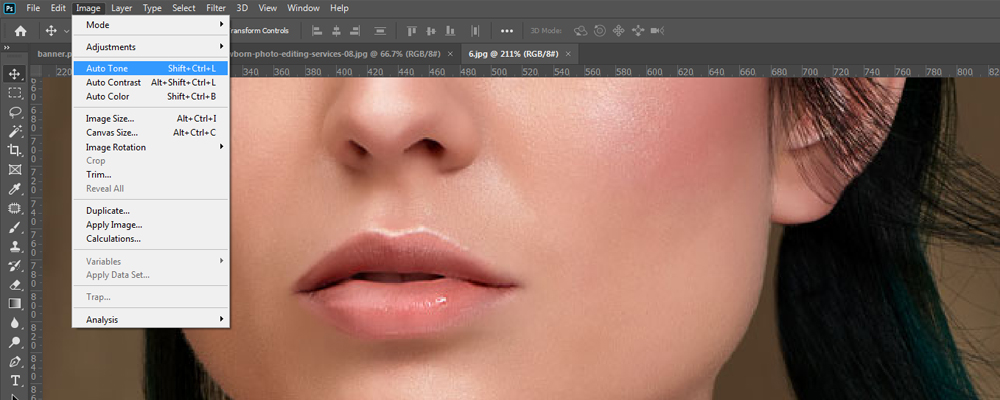
5. Adjusting Contrast and Exposure in the image
Adobe Photoshop provides a few automated changes under the Image menu, such as Auto Tone, Auto Contrast, Auto Color, and so on. You may experiment with each of these automated changes until you discover one that works for your image. It varies depending on the image because they are from various historical periods and were captured in different ways. For example, you may choose “Auto Contrast,” which increases contrast without changing colour too much.
Convert the image to black and white if it has a sepia tone. Image > Adjustments > converting your photograph to black and white is a quick and simple process. The end effect has depth and contrast without being overpowering. At this level in the restoration process, you may modify the highlights, shadows, and tones by adjusting the Brightness, Contrast, Levels, Exposure, or Curves. All of these settings are seen under Image > Adjustments.
6. Reducing Noise in the image
The noise reduction tool helps reduce and remove the utmost minor scratches and specks on the photo. Go over to Filter > Noise > Reduce Noise to apply this tool. Adjust the slider strength from 0% to reduce Noise as required. Too much noise reduction can destroy the details in the photo.
7. Exporting the image
We can save the finished restored image to our PC by selecting File > Save As. Store the image as a Photoshop (.psd) file as well as a JPEG image. Saving it into a .psd file will allow us to open up all of our layers in the future if we need to make any changes. After saving the recovered photo to your computer, we can email, share it on social media, or print it to frame the image as a brand new one.
There are various software and apps that help us restore old photos that have been damaged due to time. The other physical factors, such as water spills, dirt, and scratches, also damage the age-old photos.
The best way to restore old and damaged photos is to hire photo editing and photo retouching services. We at Digi5studios retouch more than 5000 images a day. We specialize in image retouching services: product photo retouching, automobile photo retouching, fashion photo retouching, and real estate photo retouching. We also deal with clipping path services, colour correction, and various other image editing services.