
Wondering how to bring life to your old and vintage photos that are stored away for a decade or more? The photos might be dull, shady, and unappealing to look at, but the picture might be of great importance to you. Luckily now we can hold a digital copy of the photos we click.
Most of the photographs that require Photo Retouching Services are from the era before digital imagery. Sometimes photos taken by digital camera and printed also need retouching. The objective here is to restore the old photos from the present condition to look exactly like when they were created.
Forethought
Take extreme care while scanning the photos. Scan the pictures in high-resolution and in proper lighting conditions. Scan the photo in RGB that is the color mode and not the black and white mode. This process prevents the colors from misrepresentation and sometimes affects the contrast and exposure during color correction.
Try to differentiate defects in the picture and defects that appeared due to storing them for many days. You might mistake an error in the photo scene for damage, such as a crease.
Don’t be overwhelmed with the tools in Photoshop, and try them all on the pictures. The motive here is the restoration of old photos. So choose the tools wisely and use layers for each tool. Here is a workflow to retouch old photos.
Crop the image and use the Patch tool
First steps first, use the crop tool to crop out the corners and edges of the photo. Use this action to remove the torn edges and folds. Select the crop tool from the Toolbar and adjust the handles to crop the image just enough to focus on the subject.
The cropped image could be sided or oval dimension. While cropping, you might have cropped an essential part of the photo that makes the background. Select the Patch tool to draw a selection of the area missing and drag the selection to an area that closely resembles the missing space.
Spot Healing Brush tool
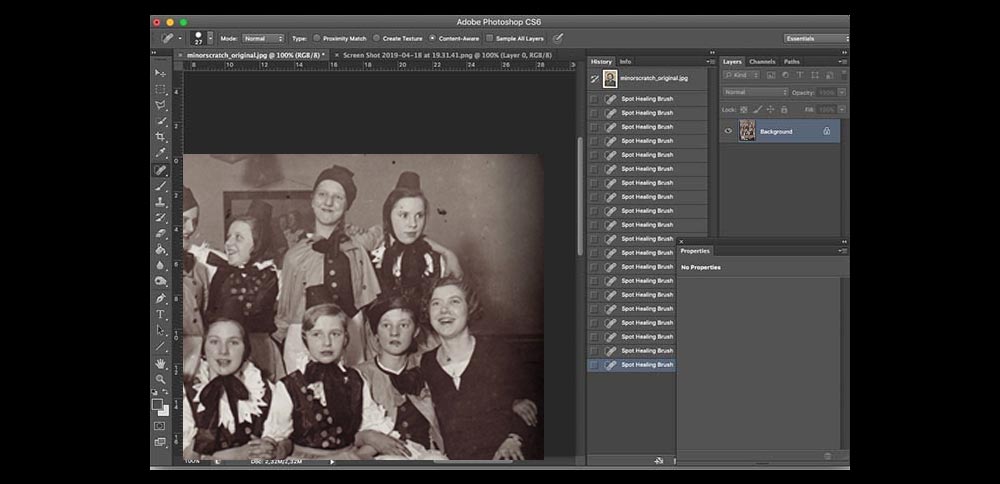
Now it is time to work on the spots and minor creases. Select the Spot Healing Brush tool to cover up the dust spots and scratches. Then, select the content-aware and zoom in to view the imperfections.
The software sees what the eyes do not see, so use the content-aware for dust spots and scratches. Content-aware selection uses AI to clone the area with the help of surrounding pixels without having to select the desired area manually. Adjust the brush size accordingly. Now paint over the surface with small strokes to cover up the dust spots and scratches.
- Reduce noise using filters-The spot healing tool allows us to retouch the scratches and noise manually. To reduce noise, we can also use Filter > Noise > Dust & Scratches. In the pop-up, adjust the Threshold and Radius pixels accordingly. Next, repeat the steps- Filter > Noise > Reduce Noise. Then, adjust the sliders for the required intensity of the filter.
Clone stamp tool
The clone stamp tool covers up major imperfections and highly damaged areas in the photo giving you more precise retouching. It is helpful to retouch spots that are dropped by the spot healing brush tool. Select the Clone Stamp tool and drag the cursor on the surface you want to use. Next, drag/click the cursor on the damaged area to replace the pixels. Lower the opacity of the brush for better blending in with the backdrop. Always use layers for non-destructive retouching.

Dodge and Burn
This tool works on darkening the bright areas and brightening the dark areas of the photo. You can use this to erase fine lines on the person’s skin or highlight a few areas.
To apply the Dodge effect:
- Select Layer > New adjustment layer > Curves.
- In the dialog box, lighten the photo by sliding the cursor upwards.
- Invert the color of the mask to change it to black.
- Take the brush tool and make the foreground color white.
- Apply the Dodge effect on the subject to lighten areas in the photo.
Finally, select Image > Apply Image > in the dialog box(layer- merged, blending- multiply, opacity- 100%) > Ok.
To apply the Burn effect:
- select Layer > New adjustment layer > Curves.
- In the dialog box, slide the cursor downwards for a darker hue accordingly.
- Invert the color of the mask to change it to black.
- Apply the Burn effect on the other areas of the photo.
Finally, select Image > Apply Image > in the dialog box(layer- merged, tick invert, blending- multiply, opacity- 100%) > Ok.
Other points to keep in mind while retouching complex photos
- You can sharpen the photo using Sharpness adjustment. Select the Filters > Enhance > Sharpen. The dialog box set the Radius value to 1.00 with the Amount and Threshold at their default values. Click Ok.
- Bring Color to black and white photos- Use Auto Color or Color Balance > Hue/Saturation Adjustment Layers for accurate color representations of the black and white images.
- Auto white balance is useful for photos that have faded colors. Select Colors > Auto > White Balance. Then change the blend mode to ‘Multiply’ to restore the density in the photo. You could do this on a single layer or work on two different layers and then merge them.
- Learn to read the histogram. For advanced retouching for faded and discolored photos, use histograms and curves. The graph speaks volumes about brightness, contrast, and exposure.
It could be an arduous task and time-consuming to restore piles of old photos, but looking at those pictures, you might want to relive those memories and feel like hanging them on a wall.
Photo Retouching Services
Are you looking for clipping path services? Having a photo retouching specialist work on your photos brings multifold value to the subject. We at Digi5Studios can work on bulk orders to retouch old photos.
We specialize in Product photo retouching, Beauty retouching, Fashion retouching, Automobile photo retouching, Real Estate retouching, and Clipping Path Services.