
We all adore newborn babies. Parents often want to click pictures of their newborns but cannot capture the little ones in a photo to preserve. They wish to see their baby look flawless in pictures as the images are saved for eternity. Photographers are hired to take photos of newborn babies. The raw newborn baby images might have inadequate exposure and white light balance. Hence comes the role of professional photo retouching services to make subtle changes to the baby’s skin and background, making them a delight to the eyes.
A baby is cute and beautiful in its own way. But sometimes, the curves around the body may not be very appealing in different poses. When the photo is viewed normally, it does not seem to be a big deal. The nuances show up once we zoom into the photo.
Adobe Photoshop is one of the best software for newborn photo retouching. When it comes to retouching newborn baby photos, we make sure the baby’s skin is natural looking. It is similar to fashion retouching, as in baby’s skin, we are dealing with rashes, pimples, skin flakes, and other minor temporary imperfections. We shall not edit the photo to the extent where the baby looks unrealistic. Keeping the baby’s features intact, we should focus on editing the newborn baby photo’s exposure and contrast.
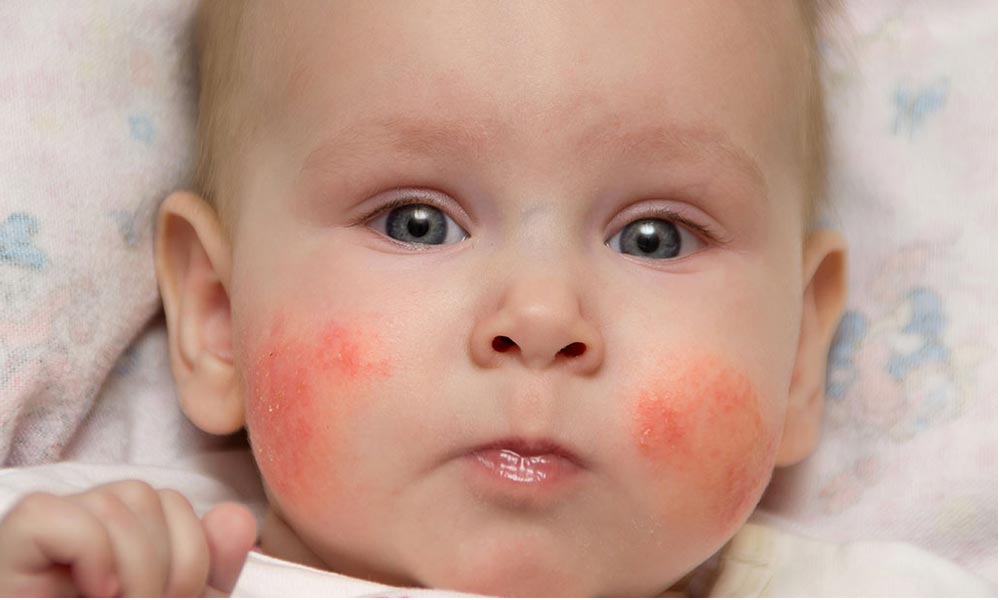
Photos are retouched with the client’s approval and suggestions. Different parents have different opinions on which features to edit. The baby’s features like skin colour and birthmarks are to be retained. The temporary imperfections on the skin such as acne, dry lips, stork bites and blotchy areas. Petechiae is red spots on the baby’s skin that appear when the baby is born through the birth canal. Fortunately, all these marks fade away within a month.
Workflow to retouch newborn baby photos
Remove blemishes
The tool we are using is the Spot Healing Brush tool. This tool is useful to replace a bad textured surface with a good textured surface. It helps erase skin flakes and acne. Firstly, add a new layer from the layer icon to make changes separately from the original photo. A Dialog box will appear for the new layer and name it as “Removing Blemishes.” The new layer appears in the layer’s box. Now select the Spot Healing Brush tool from the tools on the left side of the screen. Select the Sample All Layers icon in the options tab to select the original photo and the layer “Removing Blemishes.” Next, select the Content-Aware in the type section. The tool chooses good texture from the surroundings and applies it to the required surface. Now Adjust the width of the brush according to the size of the blemishes. Start with more minor imperfections on the face and body to even the surface. And then increase the width of the brush to remove more significant spots. Repeat this process with shorter strokes for an even tone on the baby’s surface. Other tools such as Clone Stamp, Healing Brush, Patch tool with pixels and patterns can be used to remove blemishes on the baby’s skin.
Removing redness on baby’s skin
Making skin tone appear constant through Hue/Saturation adjustment tool to focus on the huge patches of redness on the newborn baby’s skin. By applying Hue or Saturation adjustment, the overall colour of the professional photo retouching services . So we should make sure the photo looks realistic while using the color correction tools. Select Layer icon > New Adjustment Layer > Hue/Saturation. Now clicking on the pull-down arrow, we see a drop down to adjust the hue and saturation. Decreasing the saturation of red hue by sliding the scale, we can do the same to purple colour on the skin. Make sure the photo does not look too warm, which disturbs the overall look.
Smooth baby’s skin
To Smooth and soften the newborn baby’s skin, we create a new layer by selecting the Layer > New Layer. Rename the new layer as “Smoothing Skin”. The new layer appears on top of the original photo and “Removing Blemishes” layers. Now from the Menu, selecting Filter >Blur > Gaussian Blur. A dialogue box appears under the Gaussian Blur. Set the Radius to 8.0 pixels. This layer has to be inverted using the White Layer Mask and brush on the skin that is looking rough. The check box turned black shows that the layer has been inverted. While using the brush, we must make sure we are not hovering over the eyes, nose, or lips.
Editing the background
Most of the photos have a blanket or a soft cloth as background where the baby is resting. While clicking pictures, the photographer focuses more on the baby and less on the background. So sometimes, the scene might not only be the blanket but walls or furniture. We can use Photoshop to edit the background by removing distracting surfaces.
We use the Quick Selection tool to select the surface that we want to keep. In this situation, we want to keep the baby’s body and edit the rest of the photo. Alternative to the Quick Selection tool, we can use the Clipping Path tool to select the subject. Now click Select and mask, this gives us the Properties section. In the Properties section, adjust the scale in the Global Refinements. The adjustments are to be made with less contrast from the baby’s skin tone and clothes. If the background is lighter than the subject(the baby), then lower the Shift Edge value to blend into the subject. Now click Ok to create a copy of the image editing services with the mask.
Next, create a layer from the New Layer icon. Select the Brush > select a small piece from the background you want to blend, i.e., the blanket > start painting by choosing the Opacity with 20%. Keep blending the unwanted surface with the blanket until it merges and looks complete. This tool works with a plain background. We will have to use the patch tool for backgrounds with designs or patterns. Overall, we must make sure the backdrop does not get highlighted than the subject.